Introduction
The Join by ID feature for CONNECT allows users to join MS Teams, Google Meet and Zoom meetings from their video system by using the native Meeting ID as found in meeting invitations.
Pre-requisite
The feature should be enabled on your Synergy SKY Suite server. The server must be running software version 31.12.7081 or later.
This feature requires a new Room resource account in Exchange to process invites for Join by ID feature. This resource account should be set up with the following mailbox permissions:
Configure SynergySky for Join by ID
Add the resource mailbox to SynergySKY Management SUITE configuration in Config Tool.
The section can be found under JOIN named Join By ID
IMPORTANT: Do not modify SIP Domain for Macro unless specified by SynergySKY.
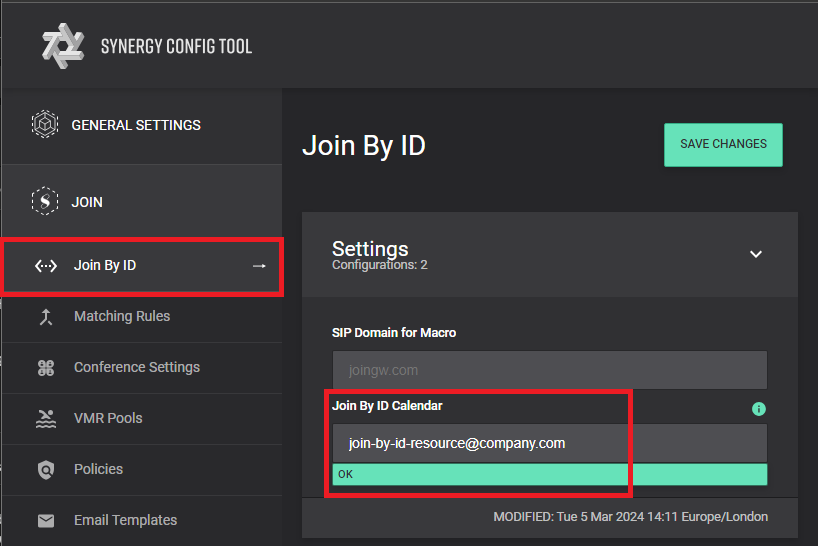
Note: It is recommended to test booking the Join by ID resource to confirm this resource is processing meetings before proceeding to configure the Transport Rules.
The Synergy SKY Management SUITE includes the Join By ID macros and an uploading mechanism for Cisco video systems.
To enable the macro to be pushed to your video system, navigate to Video Systems under General Settings. Click edit on your Cisco video system and scroll to macro section:
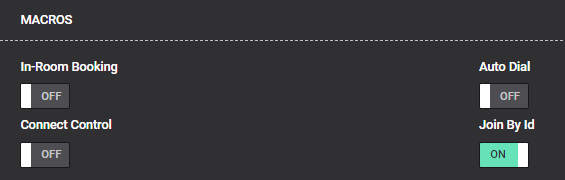
Please ensure that the video system supports macros and you can find guide on enabling the macro engine by following this link.
This feature can be enabled across an entire organization by using transport rules (also known as mail flow rules) to identify and take action on messages that flow through your Exchange organization. Transport rules are similar to the Inbox rules that are available in Outlook and Outlook on the web. The main difference is transport rules take action on messages while they are in transit, and not after the message is delivered to the mailbox. Transport rules contain a richer set of conditions, exceptions, and actions, which provides you with the flexibility to implement many types of messaging policies. More documentation can be found on the Microsoft documentation pages.
The example below shows how to set up a transport rule which forwards platform specific meeting invites to the room resource account, and a second transport rule to remove the acceptance emails sent by this room resource account to avoid the appearance of the room resource account in the meeting participant list.
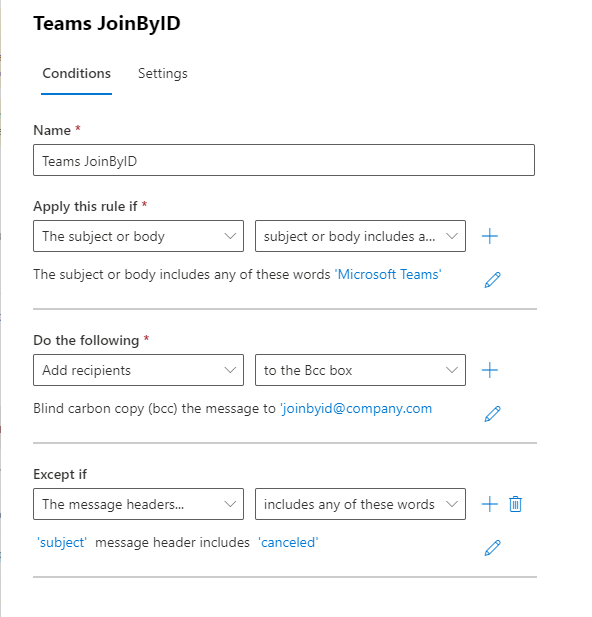
To add the resource account as BCC to all MS Teams meetings.
1. Log into the Exchange Admin Center and navigate to Mail Flow and Rules.
2. Select 'Add a rule' and choose 'Create a new rule' from the list
3. Set the following rule conditions
Example
4. Choose 'Next'
5. Select 'Enforce' on 'Rule mode'
6. Select 'Next'
7. Select 'Finish', on the 'Review and finish' page.
8. Note: Make sure to enable the rule as all new rules are by default disabled.
Duplicate the above rule and change trigger words in bullet 3 from "Microsoft Teams" to "Join Zoom Meeting"
Duplicate the above rule and change trigger words in bullet 3 from "Microsoft Teams" to "Join with Google Meet"
To delete all acceptance/tentative/declined notifications sent from the dedicated resource account
1. Log into the Exchange Admin Center and navigate to Mail Flow and Rules.
2. Select 'Add a rule' and choose 'Create a new rule' from the list
3. Set the following rule conditions
Example

4. Choose 'Next'
5. Select 'Enforce' on 'Rule mode'
6. Select 'Next'
7. Select 'Finish', on the 'Review and finish' page.
8. Note: Make sure to enable the rule as all new rules are by default disabled.


